The Methods That Don’t Work to Get into a Locked iPhone without Password
There are plenty of methods on the internet claiming to help get you into a locked iPhone without password but most of them are ineffective.
Older versions of iOS had a bug that allowed you to sneak in by making a fake emergency call. This no longer works.
Some tutorials suggest that you can delete the passcode from your iPhone's keychain directory using iExplorer, iPhone Browser, or SSH on your jailbroken device. That no longer works either.
Other tutorials suggest that you can bypass the password and get into a locked iPhone. This only works on old iOS version and no longer works, especially if you have the iOS 11 and iOS 12.
We even tested to see if Find My iPhone's passcode lock tool would allow us to set a new passcode lock. It does not.
While you're welcome to try out any methods you do find online, we've tested as many as we could locate and only one works. If you'd rather not spend your time trying tricks that no longer work.
You may also like:
iPhone backup unlocker:Recover iTunes Backup Password.
iPhone backup extractor :The best iPhone Backup Extractor software to extract photos, text messages, contacts, voice memos, note, WhatsApp, Viber and etc from iPhone/iPad backupGihosoft Free iPhone Data Recovery is a professional iPhone Data Recovery software to get back all your lost text message, photo, video, call history, note, contact and more from iPhone/iPad/iPod Touch. It offers a full solution to recover your lost data in different tough situations. Besides recovering data directly from iPhone, iPad and iPod touch, it also allows you to recover data from iCloud and iTunes backup files.
Tuesday, 14 August 2018
How to Change iPhone Password Even If I Forgot It
How to Change iPhone Password Even If I Forgot It
When does iPhone Require You to Enter Password
You can set a passcode on your iOS device to protect your data and privacy, but the passcode you set won’t be required at every point of using your iPhone. It will only be required in the following operations:
When you turn on or restart your iOS device.
Jihosoft Android Data Recovery: the best Android Data Recovery software for Windows and Mac to recover deleted contacts, messages, photos, videos, WhatsApp and etc from Android devices.
When you press the Home button on Touch ID enabled devices or swipe on Face ID enabled devices.
When you update your iPhone software and had to restart it.
When you want to erase your iOS device.
When you want to view or change your passcode settings.
When you want to install or configure your profiles.
When you want to add a new finger to your Touch ID.
How to Change Password on iPhone
You can change your passcode or passcode settings from the iPhone Settings app. However, you can only use this step-by-step guide if you remember your iPhone passcode.
Here is the systematic guide to follow:
Step 1. Open your iPhone Home screen and go to the Settings app.
Step 2. Choose your iPhone model:
On devices with Touch ID: click “Settings > Touch ID & Passcode”.
On devices without Touch ID: click “Settings > Passcode”.
On iPhone X: go to “Settings > Face ID & Passcode”.
Step 3. Enter your current password.
Step 4: Choose Change Passcode. Enter the old password and then the new password. You can tap “Passcode Options” to switch to a 4-digit numeric passcode or a custom alphanumeric passcode. Enter the new password with the option you picked and veryfy it.

There are other settings and options that you can switch to if you don’t want to change your iPhone passcode.
Turn Passcode Off: As its name shows, it will remove passcode. iPhone won’t ask you for it any longer.
Require Passcode: You can change this setting to include at what point passcode will be required.
Allow Access When Locked: You can allow access to some iOS features when your iPhone is locked.
Erase Data: Choose whether to erase your iPhone, iPad or iPod touch automatically after 10 failed password attempts.

If you lost videos from iOS Camerall Roll which are nowhere to download again, you can use Gihosoft iPhone Data Recovery to get back deleted videos from iOS device including iPhone, iPad and iPod Touch.
When does iPhone Require You to Enter Password
You can set a passcode on your iOS device to protect your data and privacy, but the passcode you set won’t be required at every point of using your iPhone. It will only be required in the following operations:
When you turn on or restart your iOS device.
Jihosoft Android Data Recovery: the best Android Data Recovery software for Windows and Mac to recover deleted contacts, messages, photos, videos, WhatsApp and etc from Android devices.
When you press the Home button on Touch ID enabled devices or swipe on Face ID enabled devices.
When you update your iPhone software and had to restart it.
When you want to erase your iOS device.
When you want to view or change your passcode settings.
When you want to install or configure your profiles.
When you want to add a new finger to your Touch ID.
How to Change Password on iPhone
You can change your passcode or passcode settings from the iPhone Settings app. However, you can only use this step-by-step guide if you remember your iPhone passcode.
Here is the systematic guide to follow:
Step 1. Open your iPhone Home screen and go to the Settings app.
Step 2. Choose your iPhone model:
On devices with Touch ID: click “Settings > Touch ID & Passcode”.
On devices without Touch ID: click “Settings > Passcode”.
On iPhone X: go to “Settings > Face ID & Passcode”.
Step 3. Enter your current password.
Step 4: Choose Change Passcode. Enter the old password and then the new password. You can tap “Passcode Options” to switch to a 4-digit numeric passcode or a custom alphanumeric passcode. Enter the new password with the option you picked and veryfy it.
There are other settings and options that you can switch to if you don’t want to change your iPhone passcode.
Turn Passcode Off: As its name shows, it will remove passcode. iPhone won’t ask you for it any longer.
Require Passcode: You can change this setting to include at what point passcode will be required.
Allow Access When Locked: You can allow access to some iOS features when your iPhone is locked.
Erase Data: Choose whether to erase your iPhone, iPad or iPod touch automatically after 10 failed password attempts.
If you lost videos from iOS Camerall Roll which are nowhere to download again, you can use Gihosoft iPhone Data Recovery to get back deleted videos from iOS device including iPhone, iPad and iPod Touch.
Sunday, 17 June 2018
HOW TO TAKE MEASUREMENTS
HOW TO TAKE MEASUREMENTS
Step 1 Open the Measure app. The app will now instruct you to move your iPhone/iPad around to check the spatial arrangement.
Move your device slowly to ensure the camera glances over each object in your immediate surroundings.

Step 2 Tap the + icon to add and place a point over the object you want to measure distances from. Alternatively, you can use the “pointer” icon present in the middle of the screen to add points on-the-fly.
I will measure the distance between the USB cable and the rectangle present above it for demonstration purposes.Gihosoft iPhone Data Recovery is a professional iPhone Data Recovery software to get back all your lost text message, photo, video, call history, note, contact and more from iPhone/iPad/iPod Touch. It offers a full solution to recover your lost data in different tough situations. Besides recovering data directly from iPhone, iPad and iPod touch, it also allows you to recover data from iCloud and iTunes backup files.
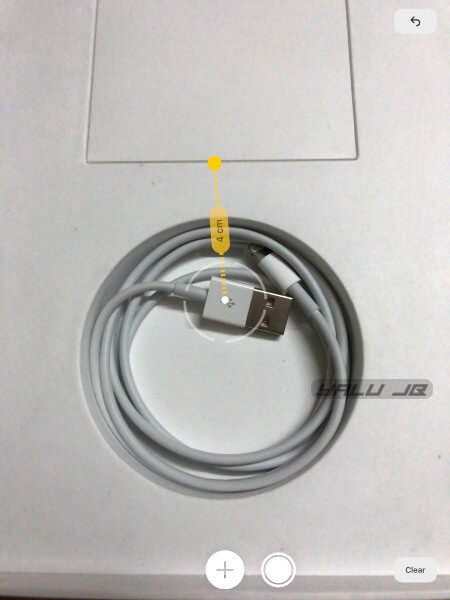
Step 3 Now move your device over to the desired point. Though the default unit is centimeter, you can easily get the value in inches in the “Length” section.

Step 4 Once the measurements are done, you can then copy the values and paste them in apps like Notes. To save the current snapshot to your camera roll, simply tap the circular white button once. This will allow you to save them for future reference.

DELETING MEASUREMENTS
To clear measurements in a one-by-one manner, simply tap the “arrow” button given at the top of the app. Alternatively, you can tap “Clear” to reverse all values and start from scratch.
CALCULATING AREA
Step 1 Point your camera to a rectangular shape.
Step 2 Wait for the app to automatically measure its length and breadth.

Step 3 Tap anywhere on the object on your screen to calculate its area. My iPad case shown below has an area of 408 cm² while its length and breadth are 24 cm and 17 cm.

ACCESSING THE LEVEL TOOL
Earlier, the “Level” tool was a part of the stock Compass app. However, Apple axed this feature from the Compass app and added it to the Measure app.
It ensures that your iPhone is placed correctly vertically or horizontally and possesses the required orientation to get accurate measurements.
Surprisingly, this tool is missing from the iPad and it seems like only iPhone users can use it.
Step 1 Tap Level.
Step 2 Adjust your iPhone until it hits 0° or the required angle with respect to the horizontal or vertical.
WRAPPING UP
Since this firmware is still in beta stage, this app comes with a few caveats.
For example, my iPad got very hot while using this app. This was confirmed by some users who also experienced overheating while taking measurements.
Apart from overheating, the results can be slightly inaccurate so I suggest using it only for approximations for the time being.
Hopefully, Apple will weed these issues out in the public build that is due to be released this fall.
Step 1 Open the Measure app. The app will now instruct you to move your iPhone/iPad around to check the spatial arrangement.
Move your device slowly to ensure the camera glances over each object in your immediate surroundings.
Step 2 Tap the + icon to add and place a point over the object you want to measure distances from. Alternatively, you can use the “pointer” icon present in the middle of the screen to add points on-the-fly.
I will measure the distance between the USB cable and the rectangle present above it for demonstration purposes.Gihosoft iPhone Data Recovery is a professional iPhone Data Recovery software to get back all your lost text message, photo, video, call history, note, contact and more from iPhone/iPad/iPod Touch. It offers a full solution to recover your lost data in different tough situations. Besides recovering data directly from iPhone, iPad and iPod touch, it also allows you to recover data from iCloud and iTunes backup files.
Step 3 Now move your device over to the desired point. Though the default unit is centimeter, you can easily get the value in inches in the “Length” section.
Step 4 Once the measurements are done, you can then copy the values and paste them in apps like Notes. To save the current snapshot to your camera roll, simply tap the circular white button once. This will allow you to save them for future reference.
DELETING MEASUREMENTS
To clear measurements in a one-by-one manner, simply tap the “arrow” button given at the top of the app. Alternatively, you can tap “Clear” to reverse all values and start from scratch.
CALCULATING AREA
Step 1 Point your camera to a rectangular shape.
Step 2 Wait for the app to automatically measure its length and breadth.
Step 3 Tap anywhere on the object on your screen to calculate its area. My iPad case shown below has an area of 408 cm² while its length and breadth are 24 cm and 17 cm.
ACCESSING THE LEVEL TOOL
Earlier, the “Level” tool was a part of the stock Compass app. However, Apple axed this feature from the Compass app and added it to the Measure app.
It ensures that your iPhone is placed correctly vertically or horizontally and possesses the required orientation to get accurate measurements.
Surprisingly, this tool is missing from the iPad and it seems like only iPhone users can use it.
Step 1 Tap Level.
Step 2 Adjust your iPhone until it hits 0° or the required angle with respect to the horizontal or vertical.
WRAPPING UP
Since this firmware is still in beta stage, this app comes with a few caveats.
For example, my iPad got very hot while using this app. This was confirmed by some users who also experienced overheating while taking measurements.
Apart from overheating, the results can be slightly inaccurate so I suggest using it only for approximations for the time being.
Hopefully, Apple will weed these issues out in the public build that is due to be released this fall.
Saturday, 16 June 2018
Manually Uninstall iTunes and Related Software on Windows 7
Manually Uninstall iTunes and Related Software on Windows 7
Please keep in mind that, follow the steps below carefully. If you do it in incorrect order, unintended expects may occur.
Step 1. Go to “Control Panel” on your Windows 7. You can get to this by clicking the Windows key and choose Control Panel there.

Step 2. Choose “Uninstall a Program” under "Programs" there.

Step 3. Type “apple” in the search bar and enter. This will filter only Apple related software to display.

Step 4. Right click on each program and choose “Uninstall” option. Then confirm to let it start. You should follow the order below to uninstall all the Apple related software.Sponsor Ads:
Gihosoft iPhone Data Recovery is a professional iPhone Data Recovery software to get back all your lost text message, photo, video, call history, note, contact and more from iPhone/iPad/iPod Touch. It offers a full solution to recover your lost data in different tough situations. Besides recovering data directly from iPhone, iPad and iPod touch, it also allows you to recover data from iCloud and iTunes backup files.
- iTunes
- Apple Software Update
- Apple Mobile Device Support
- Bonjour
- Apple Application Support 32-bit
- Apple Application Support 64-bit
3 Verify iTunes and Its Components Are Completely Uninstalled
This part is necessary only when you manually uninstall iTunes from Windows 7. If you use iMyFone TunesFix for uninstall, no need to verify it.
To verify if iTunes has been properly uninstalled and no traces remain, open up an explorer window. Click on “Computer” and using the directories below, make sure that the following folders have been deleted.
Directories on Windows 32-bit:
- C:\Windows\System32\QuickTime
- C:\Windows\System32\QuickTimeVR
- C:\Program Files\Bonjour
- C:\Program Files\Common Files\Apple\
- C:\Program Files\iTunes\
- C:\Program Files\iPod\
- C:\Program Files\QuickTime\
Directories on Windows 64-bit:
- C:\Windows\SysWOW64\QuickTime
- C:\Windows\SysWOW64\QuickTimeVR
- C:\Program Files (x86)\Bonjour
- C:\Program Files (x86)\Common Files\Apple\
- C:\Program Files (x86)\iTunes\
- C:\Program Files (x86)\iPod\
- C:\Program Files (x86)\QuickTime\
How to Speed up Safari on My iPad, iPhone, or iPod touch?
How to Speed up Safari on My iPad, iPhone, or iPod touch?
1. Clear the History
Too much history can clutter your Safari browser. Doing something as simple as clearing this history can have a significant boost on the browser speed. Clearing your browser history is not complicated at all. All you have to do is visit your Settings, select Safari, click on Clear History and Website Data and then confirm that you want to clear history and data in the pop-up that shows up.

2. Disable JavaScript
Your Safari may have a lagging issue simply because JavaScript is enabled. To disable JavaScript in Safari, you need to visit your Settings and tap on Safari. Scroll down to the very bottom and click on Advanced. Finally, Toggle the JavaScript off. Note that there is a downside to disabling JavaScript. The downside is that some of the advanced features that need JavaScript on websites to function may not work.

3. If the Background App Refresh is Enabled, Disable it
This tip will not only have the benefit of ensuring that your Safari is not slow but it will also help you save plenty of battery. To disable the Background App Refresh, visit your Settings, tap on General, and then on Background App Refresh. Finally, toggle the Background App Refresh off.

4. Disable Automatic Downloads
Another reason as to why Safari is so slow on your iOS hand-held device may be because Automatic Downloads is enabled. To fix this, you have to disable these downloads. To do this, you need to visit the device Settings, tap on iTunes and App Stores. Simply toggle off the switches under the Automatic Downloads.Sponsor Ads:
Gihosoft iPhone Data Recovery is a professional iPhone Data Recovery software to get back all your lost text message, photo, video, call history, note, contact and more from iPhone/iPad/iPod Touch. It offers a full solution to recover your lost data in different tough situations. Besides recovering data directly from iPhone, iPad and iPod touch, it also allows you to recover data from iCloud and iTunes backup files.

5. Reset the Network Settings
Although resetting your device network settings will force you to reconnect to your Wi-Fi networks, it can help you eliminate the lagging issue in your Safari. To do this, visit your Settings and then tap on General. Scroll down to locate the Reset option. Tap on it and then select Reset Network Settings.

How to Make Safari Faster on Your MacBook Pro/Air?
1. Clear the Cache and Cookies
Safari will store information about the websites you have visited. This is supposed to make things faster. However, after some time, the stored information can contribute to your Safari becoming slow. A perfect way to eliminate this browser-lag is to clear the cache and Cookies.
To clear your cache, click on Safari on the menu bar and select Preferences from the drop-down menu that appears. Select the Develop tab and then tick on the Show Develop Menu. A Develop option will appear on the top menu. Click on it. A drop-down menu will appear. Select Empty Caches from it.
Now that you have cleared your caches, the next step is to show you how to clear cookies on safari. To do this, click on Safari and then select Preferences. Click on Privacy. Click on Manage Website Data. Then select one or more websites. Finally go ahead and click Remove or Remove All.

2. Update the Extensions
Safari will allow you to add functionality to it using plug-in programs. Examples include ad-blockers, password managers, and privacy protection. Keeping your extensions up to date will eliminate lagging. To do this, click on Safari and then select Preferences. Then, click on the Extensions tab. You will see all the extensions installed in the column on your left-hand. You will see a notification if any updates are available. Update all the extensions that need updating.

iPhone Keeps Switching to Silent, How to Fix It 2019 Guide
iPhone Keeps Switching to Silent, How to Fix It 2019 Guide
1. Adjust Your Sound Settings on iPhone
Head into your Settings app and then select 'Sounds'. Once you're in there, you need to locate the 'Ringer and Alerts' section. If the 'Change with Buttons' tab is showing as green, you can turn it off, which will stop the ringer function from interfering.

2. Use Do Not Disturb Function
Bizarrely, you can even restart your iPhone by activating one of the in-built functions – Bold Text. If you go into your settings app, hit 'General', then 'Accessibility', and then turn the 'Bold text' feature on. As soon as you slide the toggle, you'll receive a popup that states it will restart your iPhone – just tap 'Continue' and your phone will restart.Sponsor Ads:
Gihosoft iPhone Data Recovery is a professional iPhone Data Recovery software to get back all your lost text message, photo, video, call history, note, contact and more from iPhone/iPad/iPod Touch. It offers a full solution to recover your lost data in different tough situations. Besides recovering data directly from iPhone, iPad and iPod touch, it also allows you to recover data from iCloud and iTunes backup files.

3. Update iOS to Latest, If It's Not
Every time Apple brings out an iOS update, they fill it with a vast array of fixes for common bugs that they've received complaints about. So, you may find that just updating to the latest version of iOS will do the trick to solve iPhone keeps switching to silent. If you're not aware of the best way to update your device, click here.


How to change the screen notification settings Lock on iPhone and iPad on iOS 12
How to change the screen notification settings Lock on iPhone and iPad on iOS 12
# 1. Call Notification Center on your iOS device.
Step # 2. Now, Swipe to the left on an alert and press "Manage".
Gihosoft iPhone Data Recovery is a professional iPhone Data Recovery software to get back all your lost text message, photo, video, call history, note, contact and more from iPhone/iPad/iPod Touch. It offers a full solution to recover your lost data in different tough situations. Besides recovering data directly from iPhone, iPad and iPod touch, it also allows you to recover data from iCloud and iTunes backup files.

Alternatively, you can press and hold an alert → press ellipses (•••)

Step # 3. Then a menu will appear on the screen.
Now you have two options:
Deliver quietly: It will pass the alerts from the lock screen and directly go to the notification center. In addition, you will not hear any sound or vibration. But the badge of the application will continue to display
Disable: It allows you to completely disable the notifications of the application.

Hint: Anytime you want the alert to arrive on LS in its own right, go to the notification of the application and slide your finger on it. Then tap "Manage" and select "Deliver Prominently".
If you lost videos from iOS Camerall Roll which are nowhere to download again, you can use Gihosoft iPhone Data Recovery to get back deleted videos from iOS device including iPhone, iPad and iPod Touch.
# 1. Call Notification Center on your iOS device.
Step # 2. Now, Swipe to the left on an alert and press "Manage".
Gihosoft iPhone Data Recovery is a professional iPhone Data Recovery software to get back all your lost text message, photo, video, call history, note, contact and more from iPhone/iPad/iPod Touch. It offers a full solution to recover your lost data in different tough situations. Besides recovering data directly from iPhone, iPad and iPod touch, it also allows you to recover data from iCloud and iTunes backup files.
Alternatively, you can press and hold an alert → press ellipses (•••)
Step # 3. Then a menu will appear on the screen.
Now you have two options:
Deliver quietly: It will pass the alerts from the lock screen and directly go to the notification center. In addition, you will not hear any sound or vibration. But the badge of the application will continue to display
Disable: It allows you to completely disable the notifications of the application.
Hint: Anytime you want the alert to arrive on LS in its own right, go to the notification of the application and slide your finger on it. Then tap "Manage" and select "Deliver Prominently".
Subscribe to:
Comments (Atom)
How to Use Siri Handsfree on iPhone 2019
Tip 1 What Is Hey Siri Function on iPhone With Hey Siri features on, you can use Siri without pressing the Home button. If you have an iOS d...

-
Tip 1 What Is Hey Siri Function on iPhone With Hey Siri features on, you can use Siri without pressing the Home button. If you have an iOS d...
-
2. How to Copy MP3 to iPhone Using iTunes The first, and least preferable way, is to use iTunes to transfer the MP3 files. Here is how you c...
-
HOW TO TAKE MEASUREMENTS Step 1 Open the Measure app. The app will now instruct you to move your iPhone/iPad around to check the spatial arr...


